Wednesday, August 31, 2011

Chocolate Pears of Hope

Here's one of the cards that we created at my last club meeting. It uses Stampin' Up!'s Strength & Hope stamp set. Today is the last day to get this beautiful set! Don't forget that Stampin' Up! is donating $2 from each set to The Breast Cancer Research Foundation.

The butterfly is rock and rolled. How do you do this? Well, it's really simple. First ink up your stamp in your lighter color, in this case Pear Pizzazz. Then roll the edges in the darker ink, here Chocolate Chip. Such a pretty effect without much effort!

Stamps: Strength & Hope
Ink: Pear Pizzazz, Chocolate Chip
Cardstock: Pear Pizzazz, Chocolate Chip, Whisper White
Accessories: Square Lattice embossing folder, Pear Pizzazz seam binding ribbon, pearls, dimensionals

Need to order this set? You can go to my website and order it. HERE's a link to my site!

Happy Stampin'!
Shelley

Tuesday, August 30, 2011

Blog Hop Recap:The Sounding Joy

I had planned to be here yesterday to give you this info but life just got in my way! You don't even want to know what I did! I was so busy I just fell into bed last night! It doesn't look like the next couple of days are going to be any better!

Creating this beautiful background was a lot of fun. First I took a little gold embossing powder and mixed it with Dazzling Diamonds. You can mix this using up to equal parts of each. For this card I mixed it in a 4 to 1 ratio. I didn't want a ton of sparkle, just a little! Hard to see in the picture but it's there! Then I inked up my Snow burst embossing folder with VersaMark ink on the side of the folder that has the Stampin' Up! logo on it, placed my Very Vanilla cardstock in the folder (don't forget to use your embossing buddy!) and ran it through the Big Shot. After removing the cardstock from the folder, sprinkle it with your embossing powder mixture. Then use your heat tool to emboss the powder.

Stamps: The Sounding Joy
Ink: VersaMark, Garden Green, Cherry Cobbler
Cardstock: Garden Green, Cherry Cobbler, Very Vanilla
Accessories: Snow Burst embossing folder, Ticket corner punch, Extra-Large oval punch, Decorative Label punch, sponges, Cherry Cobbler seam binding ribbon, dimensional, Gold embossing powder, Dazzling Diamonds

Here's another look at the ornament that I made. I started out with the top of a can of concentrated juice. Stampin' Up!'s 2 1/2" circle punch fits in these just perfectly! I punched Elegant Eggplant and then embossed the words with the new Pewter embossing powder. I adhered the cardstock to the juice lid and then filled the lid with Crystal Effects and sprinkled just a little Dazzling Diamonds on the wet Crystal Effects. After it dried, I added the ruffle on the edge. To create this I cut 1 1/2" of my DSP and punched both sides with the eyelet border punch and then cut it in half so that I had 2 long strips of punched DSP. Then I ran it through my crimper and adhered it to the back of the juice lid with Sticky Strip. To finish it off, I added the ribbon holder and another punched Elegant Eggplant circle to the back and the crown and pearls to the front!

Stamps: Artistic Etchings, The Sounding Joy
Ink: VersaMark
Cardstock: Elegant Eggplant, Basic Gray
Accessories: Neutral DSP, Pewter embossing powder, Crystal Effects, Dazzling Diamonds,
 Pearls, crimper, Basic Gray taffeta ribbon, 2 1/2" circle punch, sticky strip

Thanks so much for all the nice comments that I received due to the Blog Hop! I had lots of fun creating all the projects for it and I hope that you were inspired by everything that you saw on the hop! If you have any other questions about these or any projects, just ask! I'm happy to help!

Happy Stampin'!
Shelley


Friday, August 26, 2011

Blog Hop: The Sounding Joy!


Welcome to Stampin' Addicts Holiday Mini Blog Hop!! There are 19 fabulous stops along this hop! We will be up through Sunday so take your time and see all the new fantastic products Stampin' Up! will be releasing on September 1!

You may have just come from Cindy's Blog: Heart's Delight Cards where she featured Pines & Poinsettias. I just LOVE all her projects. My favorite it the second card with the pretty snowflake on it! If you are starting here, have no worries! The blogs are all linked together so you can get around them all! You can click HERE to see a list of all the blogs or if you get lost along the way.

I worked with the stamp set called The Sounding Joy. It's a beautiful script set based on the Christmas carol Joy to the World. My first project is kind of out of the box. I used the word Joy from the set to make a baby card! Babies really are a joy and it seemed appropriate to make this card. You can turned this into a boy or neutral or even a wedding or retirement card with a few changes!

Stamps: The Sounding Joy, Bear Hugs
Ink: Black Stazon, Pretty in Pink, Melon Mambo, Crumb Cake, Chocolate Chip
Cardstock: Pretty in Pink, Crumb Cake, Melon Mambo, Whisper White
Accessories: Brights DSP, Perfect Polka Dots Embossing Folder, Aquapainter

This next card is the first thing that I thought to do with this set! I really like the way this one turned out. Come back next week and I'll tell you how I created the background! Don't you just love the new embossing folder, Snow Burst?

Stamps: The Sounding Joy
Ink: VersaMark, Garden Green, Cherry Cobbler
Cardstock: Garden Green, Cherry Cobbler, Very Vanilla
Accessories: Snow Burst embossing folder, Ticket corner punch, Extra large
 oval punch, Decorative Label punch, Cherry Cobbler Seam binding ribbon,
dimensionals, Regal brads, Gold embossing powder

I was playing with this set again last night and came up with this beauty! I knew that I wanted to use Pool Party and made this! It uses the new Pewter embossing powder.

Stamps: The Sounding Joy
Ink: Pool Party, Basic Black, VersaMark
Cardstock: Basic Black, Pool Party, Basic Gray, Whisper White
Accessories: White organza ribbon, Pewter embossing powder, sponges, Rhinestones

My last project is an ornament. Want to know more, come back next week! It's not hard and lots of fun!

Stamps: The Sounding Joy, Artistic Etchings
Ink: Eggplant Envy, VersaMark, Basic Black
Cardstock: Eggplant Envy, Basic Gray
Accessories: Neutral DSP, Pewter Embossing powder, Dazzling Diamonds,
Crystal Effects, pearls, Basic Gray taffeta ribbon, Eyelet border punch

Hope you enjoyed my creations! Now you are off to see what Carmen can do with the new Stocking die on her blog Stamping Addiction!

Happy Stampin'!
Shelley


Thursday, August 25, 2011

Hello, My Friend!

I had my club members make this simple but striking card! I found one very similar on Stampin' Connections, a website that is just for Stampin' Up! demonstrators that has thousands of projects uploaded and lots of chatting. Want to have access to Stampin' Connections? Contact me and we'll get you set up!

Stamps: My Friend
Ink: Soft Suede
Cardstock: Soft Suede, Whisper White, Rich Razzleberry
Accessories: Itty Bitty Punch Pack, Pearls, dimensional

Not sure I changed a whole lot on this card from the original but I don't know who's creation this started out as to check it! Sorry! I just love the HELLO in this set! So pretty!

Come back tomorrow! I am going to be part of a blog hop with Stampin' Addicts! We are going to be showcasing new goodies from the new Holiday Mini that will go live on September 1st. I'm really nervous as I have never done this before! I need to finish up my projects!

Happy Stampin'!
Shelley

Wednesday, August 24, 2011

Wisteria's Friend

When the new catalog for Stampin' Up! came out I just had to join another swap! Man, you are going to think that I'm addicted to swaps! Well, you would be right. They are so much fun to create and then when they come back, it's like Christmas! I get to do this anytime that I want, not just once a year! Gotta love that!

This card is using the new stamp set named My Friend. I'm really enjoying the silhouette stamps that Stampin' Up! has been coming up with lately. They are so pretty and fairly easy to work with too! Isn't this color so pretty? It's one of the new In Colors! It's called Wisteria Wonder and it's a beautiful light purple color!

Stamps: My Friend
Ink: Basic Black, Wisteria Wonder
Cardstock: Wisteria Wonder, Basic Black, Whisper White
Accessories: Scallop border punch, corner rounder punch, Basic Black satin ribbon, Gluedots

This isn't the last of my swap cards! I have just completed 7 more swaps! Yep, I'm addicted! Aren't we all?

Happy Stampin'!
Shelley

Tuesday, August 23, 2011

Flower Garden Swap

My oldest started high school today! I'm not real sure how I feel about it. I know that she is excited and will have a ton of fun but I can't believe that Abi is off to high school! Bitter sweet!!

Anyway, here's a card that I made for the Summer Mini swap that I was in. This is using the embossing folder Flower Garden. The embossing folder made it to the catalog! Yeah! I LOVE embossing folders! In fact Abi asked me the other day if I could make a card without using my Big Shot. I, of course, said yes but it will look better with using the Big Shot!!

Stamps: En Francais,All Holidays
Ink: Old Olive, Eggplant Envy
Cardstock: Old Olive, Eggplant Envy, Sahara Sand
Accessories: Ticket corner punch, Old Olive satin ribbon, sponge daubers, Flower Garden embossing folder

The greeting has retired but I'm sure you can find something to fit there instead! I adore purple and green together and this is my favorite combo!

Happy Stampin'!
Shelley

Friday, August 19, 2011

Sail Away

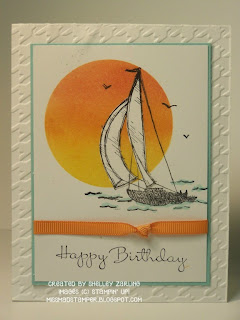
We made this card at my club meeting a couple of weeks ago. I fell in love with it when I saw it in the gallery at Stampin' Addicts and had to recreate it! Mary Brown is the original creator of this card. I changed colors and added a knot to the ribbon. Mary had used Tempting Turquoise but I just had to use the new Pool Party! I also used the new Houndstooth embossing folder. You can see Mary's card HERE.

Stamps: Sail Away, Happiest Birthday Wishes
Ink: Daffodil Delight, Pumpkin Pie, Tangerine Tango, Black Stazon
Cardstock: Whisper White, Pool Party
Accessories: Pumpkin Pie grosgrain ribbon, 2 1/2" circle punch, Pool
Party maker, sponges, Houndstooth embossing folder

I really like how white the sails stayed and the sun set is one of my favorite to create on cards! So simple yet stunning! Hey, did you notice? I remember where I CASEd this card from! I'm willing to bet that doesn't last long!

Happy Stampin'!
Shelley


Thursday, August 18, 2011

Summer Mini Swap

This is another card that I created for the Stampin' Up!'s Summer Mini swap that I done. This card use the stamp set Bold Blossom. It has four images and they are all on this card! Boy am I good! Just kidding! This stamp set will not be available again after August 31. So don't miss this set either!

Stamps: Bold Blossom
Ink: Certainly Celery, Pretty in Pink, Marina Mist, Real Red
Cardstock: Marina Mist, Real Red, Pretty in Pink, Whisper White
Accessories: Real Red grosgrain ribbon, Brights Brads, Blossom
Triple layer punch, Square Lattice embossing folder, dimensionals

The right side of this card is done with a technique called Inlaid Emboss. It's super simple! Cut out your shapes and glue them in place and run it through your embossing folder. My little butterfly is Rock and Rolled. Another of my favorite techniques! If you need help with either of these, let me know! Would love to create something fun with you!

Happy Stampin'!
Shelley


Wednesday, August 17, 2011

I Scream, You Scream!

I scream, you scream, we all scream for ice cream! I LOVE ice cream and my hips show that I'm NOT lying! Anyway, I created this fun card using Stampin' Up!'s Sunny Fun and Pennant Parade. Sorry about the smudge on the card. My fingers get inky quite often and I usually don't realize it until I pick something up! With this card, the mark didn't get on it until I went to take the picture! Oh well, it's still cute!

Stamps: Sunny Fun, Pennant Parade
Ink: Chocolate Chip
Cardstock: Pear Pizzazz, Melon Mambo, Chocolate Chip
Accessories: 2 1/2" circle punch, Build a Cupcake punch, Petite Pennant punch, Scallop border punch, Perfect Polka Dot embossing folder, Pear Pizzazz, Melon Mambo, & Chocolate Chip markers, dimensional

Pennant Parade is one of my new favorites in the catalog. There is so much you can create with this stamp set and punch! I showed you Christmas trees and now an ice cream cone. What can you create?

Don't forget that the Summer Mini is coming to an end and Sunny Fun is one of the stamp sets that won't be avaliable after August 31! Get it while you can!

Happy Stampin'!
Shelley


Tuesday, August 16, 2011

Sunny Fun Swap Card

Way back in April, before Stampin' Up!'s Summer Mini was released, I joined a group of demonstrators in a swap. Swaps are where you make a predetermined number of cards or card fronts, mail them to the hostess and she will trade cards for you. I LOVE swaps! It's such a fantastic way to get ideas as well as samples of stamp sets you don't own! Swapping can be hard on the pocketbook though. There has been more than one time that I didn't think I needed a stamp set and then fell in love with a swap and HAD to have that set! Come on, you ALL know what I'm talking about!

Anyway, this is my card for this swap. It uses the stamp set named "Sunny Fun". My girls have really enjoyed this set! I've had some fun with it too!

Stamps: Sunny Fun, Dot, Dot, Dot
Ink: Stazon Jet Black
Cardstock: Pumpkin Pie, Tempting Turquoise, Rose Red, Whisper White
Accessories: Scallop border punch, Basic Black 1/8" taffeta ribbon, aquapainter

The time for the Summer Mini is coming to an end! Don't miss out on the fantastic stamp sets that won't be available after August 31! You can check it out and order on my website HERE!

Happpy Stampin'!
Shelley


Monday, August 15, 2011

Confirmation Cards

Well, I showed you all the fabulous pictures that I created for Confirmation, now I have to show you the cards that went with those gifts! These aren't very hard but I LOVED the way they turned out! I wasn't going to give my daughter, Abi, one because they were late and we had talked about it. She seemed OK with that until she saw the cards. Then she wanted one for her memory book too!


They really are the same, just different colors. It amazes me how just changing the color of something can change the feel and look of the card! The first one is done in Peach Parfait. The next one is Poppy Parade.

Stamps: Crosses of Hope
Ink: Basic Black
Cardstock: Peach Parfait or Poppy Parade
Accessories: Scallop border punch, Pearls, DSP pack-In Color, dimensional

 I guess I would want one for my memory book too!

Happy Stampin'!
Shelley

Saturday, August 13, 2011

Confirmation Gifts:Part 2

Here are the other 5 frames that I made for confirmation gifts! They are mostly Stampin' Up! They are also 8x10's. I have had a lot of fun making these for the young adults in our congregation! My oldest daughter, Abi, likes to help pick out the background papers and then I create from there!


Happy Stampin'!
Shelley


Friday, August 12, 2011

Confirmation Gifts:Part 1

I don't normally post things that aren't Stampin' Up! only products but I have to show you what I made for confirmation gifts this year! With my husband being the pastor, I like to give each of the young adults that are being confirmed in their faith something as a congratulations gift from my husband (and the rest of the family too!) These gifts can get pricey quickly so I have gone to making them.

This year I printed the confirmands' Bible passages on the computer and then matted them. I am trying to use up some paper that I had bought before I became a demo for Stampin' Up. Hence they are not Stampin' Up! only projects but they could be recreated with Stampin' Up! papers too!

The crosses were given to me from a friend that didn't think she had a use for them! They are metal and have dimension to them. Thanks, Kim! They worked PERFECTLY for these gifts and I still have several left over for more! The words are die cut with the Big Shot from the raw Decor Element sheets that Stampin' Up! sells.


I have 5 more to show you tomorrow! I hope you like them and will forgive me for not using only Stampin' Up! on them! I still think they turned out great!

Happy Stampin'!
Shelley


Thursday, August 11, 2011

Graduation!

As many of you know, my husband is a pastor. This gets us invited to many parties that we may not have been invited to otherwise! One such thing is graduations. I think we had 8 or 9 graduations this spring and summer to attend! These graduations can be from a couple of high schools in the area too. I always try to create a card that uses their high school colors. These are the first two cards that I made this spring. Friends of ours have a set of twins that graduated from Shoreland Lutheran High School. These are the cards that I made for Steve and Mike (I'm not sure which one got which card!).

Stamps: Well Scripted
Ink: Basic Black
Cardstock: Summer Sun, Basic Black, Whisper White
Accessories: Basic Black Satin ribbon, Small and Large star punches,
Ticket corner punch, rhinestones, Basic Black marker

I don't know if you can tell, the white background is embossed with the square lattice with the stars on it!

Stamps: Word Play
Ink: Basic Black, Summer Sun
Cardstock: Basic Black, Summer Sun, Whisper White
Accessories: Small and large star punches, square lattice embossing
 folder, rhinestones, spiral punch, dimensional

The yellow strip is embossed on this one.

Happy Stampin'!
Shelley


Wednesday, August 10, 2011

Two Tags Basket

At Stampin' Addicts, they have a 3-D Challenge every Monday. Holly does a FANTASTIC job of creating different projects and making videos for the step by step on how to create her projects! Thanks, Holly!!

This little basket was one of those 3-D projects. I LOVE this little basket! We created this at one of my club meeting and my ladies LOVED this basket too!

Stamps: Bold Blossom
Ink: Peach Parfait, Poppy Parade
Cardstock: Peach Parfait, Pear Pizzazz, Whisper White
Accessories: Scallop oval punch, Large oval punch, Two tags die, Poppy
 Parade ribbon, Sunny Garden DSP

The Designer Series Paper on this project is retired but the new Stampin' Up! catalog has some fabulous new papers and they are on sale this month!! When you purchase 3 packs you get the 4th one free! Need a catalog? Call or email me and I will get you one right away or you can look at it online at my website HERE. Once you get to my site, click on the "Shop Now" button to see the catalog!

Happy Stampin'!
Shelley


Tuesday, August 9, 2011

Summer Fun!

This card was totally CASEd from someone but I can't remember who! I really need to set up some sort of system to write down who I'm CASEing from! Any suggestions? I'm open to them!

Anyway, I loved this card because the kids weren't stamped in the line that they are on the stamp! They were stamped and punched and made separate. We made this card at my club meeting and my ladies loved it! I think 3 of my 6 ladies have purchased this stamp set.

Stamps: Summer Fun
Ink: Black Stazon
Cardstock: Pacific Point, Bashful Blue, Real Red, Whisper White
Accessories: Markers, Cherry Cobbler baker's twine, Scallop Edge punch,
1 3/8" circle punch, Word Window punch, dimensionals

This is one of my favorite stamp sets from Stampin' Up!'s Summer mini catalog. It's been alot of fun to play with. Don't miss out on getting yours! It will only be avaliable until August 31!

Happy Stampin'!
Shelley


Monday, August 8, 2011

Hope & Strength

I used the stamp set named Hope & Strength for this card. This stamp set is available until the end of August and with the purchase of this stamp set, Stampin' Up! will donate $2 to The Breast Cancer Research Foundation! Don't miss out on this fabulous set for a fabulous cause!

I've seen lots of pink cards done with this set but I wanted something different. I found a card very similar to this one and I made a few changes. The greeting is from the Because I Care set that was a hostess set but is now retired.

Stamps: Beacause I Care, Hope & Strength
Ink: Daffodil Delight, Basic Gray
Cardstock: Basic Black, Basic Gray, Whisper White
Accessories: Basic Black 1/8" taffeta ribbon, Blossom Bouquet Triple layer punch, Rhinestone

You can go to my website and order this stamp set if you want, or you can call or email me and I'll get it ordered for you! What are you going to create with this AWESOME stamp set?

Happy Stampin'!
Shelley


Friday, August 5, 2011

Abi's Thank You's

In May, my oldest daughter, Abi, was confirmed. We had a big party to celebrate! She received lots of gifts and needed to send out "Thank you's" for them. She really wanted something with butterflies so this is what I came up with. I used Stampin' Up!'s Butterfly Prints to make this card.

Stamps: Butterfly Prints, Short & Sweet
Ink: Basic Gray, Pretty in Pink
Cardstock: Certainly Celery, Pretty in Pink, Melon Mambo, Whisper White
Accessories: Petals-a-Plenty embossing folder, Certainly Celery, Pretty in Pink, Melon Mambo re-inkers, baby wipe, butterfly punch, rhinestone, dimensional

The buttflies were made by using the technique called baby wipe re-inker ink pad. It's really quite easy but lots of fun! Take a baby wipe and place it on a paper plate. I like to fold my baby wipe into quarters. The place drops of your re-inkers onto the baby wipe. This is now your ink pad! One thing to keep in mind is that the colors will start to run together after a short time and this "ink pad" will dry out fast!

Happy Stampin'!
Shelley


Thursday, August 4, 2011

May Christmas Cards

I know that you are probably sick of my Christmas cards but I'm so proud of myself for being ahead of the game, I have to show off! These are my May cards for the group at Stampin' Addicts that are working on Christmas or Hanakah cards all year long! For this set of cards I used Stampin' Up! Come to Bethlehem. Here's the group picture of the 16 cards.


Here's a close up of one card.

Stamps: Come to Bethlehem
Ink: Whisper White
Cardstock: Concord Crush, Whisper White
Accessories: White embossing powder, Square lattice embossing folder,
 White grosgrain ribbon, rhinestone, dimensional

I like these because they are not your traditional colors for Christmas. The church I attend is name Epiphany and this stamp set reminds me of Epiphany, January 6, the day that the wisemen found the Christ child in Bethlehem. The Gentile Christmas!

Happy Stampin'!
Shelley


Wednesday, August 3, 2011

June Christmas Cards

Since I haven't posted in a while, I realized that you haven't seen my other Christmas cards! This set is from June and yes, they were done in June! This stamp set is now retired but I still really like it. I think the hardest part is going to be deciding who gets what card! I LOVE that I've got so many cards done and ready to go! Less stress later in the year! Yeah me! Here's the group picture of all 16 cards.


Here's a close up of one.

Stamps: Christ is Born
Cardstock: Not Quite Navy, Baja Breeze, Whisper White
Ink: Basic Gray, Not Quite Navy, VersaMark
Accessories: Ticket corner punch, Basic Gray taffeta ribbon, iridescent ice embossing powder

It's really sparkly in real life. The white has iridescent ice embossed on it.

Happy Stampin'!
Shelley

Tuesday, August 2, 2011

July Christmas Cards

Boy has it been a CRAZY summer! My girls have been in several sports camps, I was taking a graduate level class (which I got an A and 100%! Yeah me!!) and lots going on at our church too! I can't believe that I haven't posted here in 2 months! Why didn't you send out the posse looking for me?

Anyway, I have been stamping, just not much, but I have done some! Let's see what I can share with you! These are my July Christmas cards. Each month I'm making 16 cards so that come December I just have to address and mail away! I signed up to do this with several of my friends at Stampin' Addicts. I really needed to be part of a group to make sure that I was getting them done. I have wanted to do this for several years and I'm finally doing it! This is the group picture of all 16 cards!


I am loving this new stamp set the Stampin' Up! came out with! It's called Pennant Parade and it's in the new catalog!! Haven't seen the catalog yet? Well, let me know! We can get together for coffee or lemonade and take a look! There is LOTS of new goodies! Including a new hostess program! You won't be disappointed!Here's a close up of one of my Christmas cards.

Stamps: Pennant Parade, Teeny Tiny Wishes
Cardstock: Garden Green, Crushed Concord, Poppy Parade, Whisper White, Daffodil Delight
Ink: Garden Green, Crushed Concord, Poppy Parade, Daffodil Delight, Chocolate Chip
Accessories: Daffodil Delight grosgrain ribbon, Scallop Edge punch, Petite Pennants Builder punch, Square Lattice embossing folder, Perfect Polka Dots embossing folder, sponge, Itty Bitty Shapes punch pack, 2-way glue, Dazzling Diamonds, Modern Label punch, Word Window punch, dimensionals 

I really struggled with this card! I had the Garden Green, Poppy Parade and Crushed Concord all ready to go but it just didn't look right after I had stamped the trees. So I added the Daffodil Delight stars and ribbon as well as the embossed backgroud and sponging and the greeting. Very pleased with the way it turned out! Lesson learned: Keep working on it. It will turn out the way you want it too!

Happy Stampin'!!
Shelley