Well, it's been a while since My Inky Friends and I have had a blog hop but here we are getting ready for the holidays with our Handmade Holidays!

We are few in this hop but we are mighty! Giving you several ideas for last minute gifts you can create yourself and WOW your friends and family. If you are going in order then you just came from Stampin' Unicorns and Elizabeth's gold box. What a clever idea! OR you may be hopping backwards. In that case, you just came from Rubber Red Neck and saw Holly's Cup of Christmas Cheer. I don't need that set. I don't need that set. I don't...Regardless of how you found me, I'm glad you are here!
I didn't pick a stamp set to focus on this time around. I actually created these items for a secret sister gift and for my middle schoolers and decided to use them for this hop as well.
First off, I have purchase some of these wooden slices last year and put them in a drawer and forgot about them. When I was thinking about what to make for my secret sister, I was digging in my drawers to see what I could come up with and found these slices. I stamped the moose with Soft Suede ink for the outline and Crumb Cake for the solid middle. I used my Stampin' Write Marker in Real Red and drew on the scarf. The bow is adhered with a glue dot.
This is the backside of the ornament. I stamped the Merry Christmoose with Cherry Cobbler and drew the holly on with Garden Green and Real Red Stampin' Write markers. I think I should have added the date but my secret sister already has this ornament in hand! Maybe she will add it.
Many people have been making these ornaments this year with the Christmas Gleaming bundle. They look so complicated and they really aren't that hard to create. If you'd like to know more about this ornament, please let me know and I'll get that information together for you. This was a project that I created for my middle schoolers to make. They were quite intimidated by it until I walked through how to make it and now they are super excited to give it a try!
My last project was again created for my secret sister. As I stated earlier, she already has her gift and I didn't realize my pictures weren't that great. Guess I'll have to make more and take those pictures!
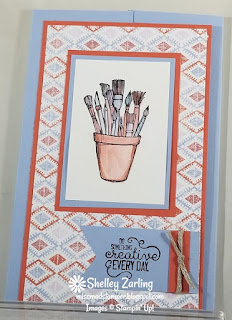
This is a junior legal pad covered. I did a gate fold around the note pad. I cut the pad cover card stock to 8x11 and scored it at 2 3/4", 3", 8 1/8" and 8 3/8" with the 11"going horizontal. I then cut the Terracotta Tile card stock to 7 1/2" by 4 1/2" and then layered. I water colored the pot of brushes. I added the tag at the bottom of the note pad cover.
Here's a look at the inside. The top piece is cut at 2 1/2" by 5 and scored at 7/8" and 1 1/8" vertically to cover the top of the pad that has the name brand on it. (It's not real pretty! Time to make it pretty!)
I hope you enjoyed my handmade gifts and that I may have inspired you to create your own gifts. Now I'm sending you off to see Holly's creation.

I hope everyone has a HAPPY HOLIDAY season!
Happy Stampin'!

Supplies:
Project 1:
Product List
Product List
Product List


1 comment:
Love these!! Such a great idea :)
Post a Comment