Showing posts with label Winter. Show all posts

Friday, March 29, 2024

Beary Cute

I so love these bears. I was really hoping they would hang around a bit longer but they were only part of the Stampin' Up! catalog for the life of the July-December mini. I had so much fun playing with them. Maybe you have them as part of your collection and need a few more ideas. Well, here are three more to add to CASE pile! (CASE stands for Copy And Steal Everything. It just means that you are using someone else's ideas as a jumping off point or a total copy when you are creating.)

The cardstock here is Pebbled Path and Real Red. I stamped the trees and snowfall with Whisper White ink. Make sure you add some re-inker to your Whisper White pad before you stamp. That fresh ink helps keep those images crisp looking. Also remember that Whisper White ink is a craft ink so it takes longer to dry. Be patient!


Wednesday, February 14, 2024

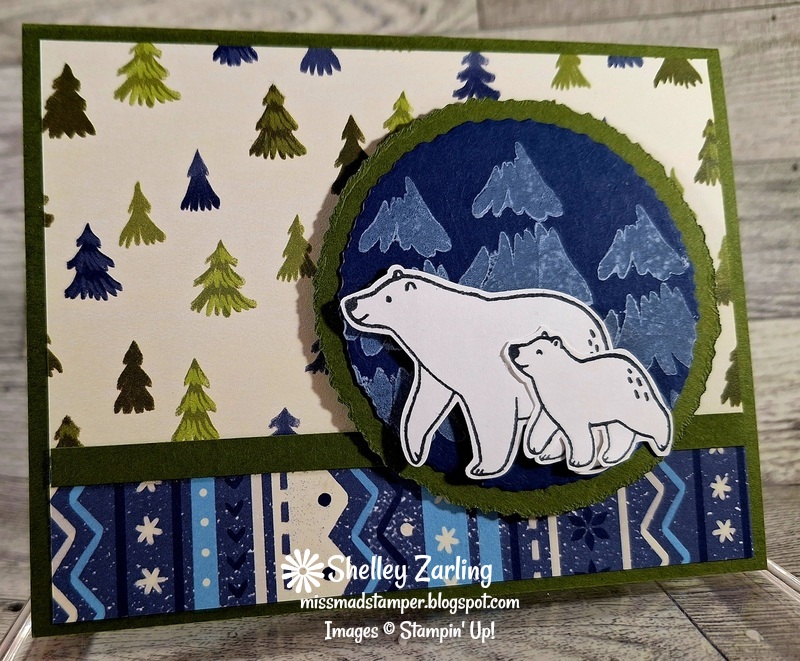
Beary Cute

I really did enjoy this bundle. The stamps, the punch, the paper were all amazing and so fun to create all kinds of awesome things with. I will admit to being pretty disappointed that this set and punch are not hanging around for a longer time but I am still sharing three more cards that I made with Beary Cute. 

The base is Mossy Meadow. I stamped the insides to the trees with Whisper White ink on Night of Navy cardstock. I added the stamped and punched or fussy cut bears to the tree layer. The designer series paper adds even more flare!


Friday, February 9, 2024

Sparkling Snowflakes

I'm going to say something that may sound like it is contradictory but it is very true. I love the snow. I hate the cold. Now, I live in SE Wisconsin, along Lake Michigan. When it snows, the temperature is usually around 30 degrees. The snow puts a blanket on the ground that keeps everything warm and quiet. I love that serene feel. That bitter cold...can just go away and never come back! Yuck! 

The intricacy of snowflakes is fascinating to me. All the details that God puts into one snowflake is just amazing. Image how much more he cares for each of us if a snowflake has that much detail. 

I used a technique here that is called wet stamping. I spritzed the paper with quite a bit of water and then stamped the image. Allow the paper to dry and then stamp the image again. It gives this halo affect to the card. I stamped the first layer with Berry Burst and the second with Blackberry Bliss.


Wednesday, January 17, 2024

Beary Cute

Beary Cute was one of my favorite stamp sets that was in the July-January mini catalog. I thought this bear was so stinking cute! I really enjoyed playing with this set. Unfortunately, I didn't get a chance to share those creations while this set was still available. 

Night of Navy, Boho Blue, and Balmy Blue is the color choice for this first card. I stamped the snowflakes with the three colors to create my own designer series paper. I ran the cardstock through Snowflake Sky embossing folder. I then used a blending brush to add some Night of Navy ink to that cardstock.


Wednesday, July 20, 2022

Peaceful Cabin

It's one of the hottest days of the year in SE WI and I'm going to share some Christmas cards!

This is a set that was available during the July-December mini catalog last year. It's called Peaceful Cabin. It had a coordinating set of dies that made playing with it even more fun.

On this first card I masked the cabin. I used the dies to do that and you can see a bit of a halo around the cabin where the trees should be but they are not. Lesson learned, trim the die cut if using to mask. To mask start by stamping the image on the cardstock where you want it. Now stamp again on a post it note or copy paper and fussy cut out. Lay the cut out image on top of the stamped image and stamp the rest around the main image. Remove the post it note image and complete card. 


Thursday, March 3, 2022

Snow Much Fun Scrapbook Pages

Well, I'm over winter! I'm ready for spring and sun and heat and soccer and...BUT I still have this awesome set of scrapbook pages to share with you! 

This set of pages really sparkles and shines but I didn't capture that in the pictures. 


Wednesday, December 18, 2019

Winter Woods 3

My last installment of Winter Woods and I have four more cards to share. In case you missed the first two posts, here they are, ONE or TWO.

This first card was labor intensive. It turned out beautiful! Maybe it felt more labor intense because I really didn't have a plan and I jumped in and then kept layering. I started with stamping the birch trees with Crumb Cake on the card base. Then I sponged the blues over the birch trees. The white layer at the bottom was ripped to create the snowbank. I stamped the frame and then fussy cut it out. I stamped the trees with VersaMark and heat embossed them with Shimmer White embossing powder. Then sponged the blues over the top. I did use a mask to keep the snowbank in tacked. I added Snowfall Puff Paint to one of the cards and Shimmery Crystal Effects on the other. The greeting was stamped and punched with a bit of ribbon added.

Whew! It really is pretty and I'm so glad I made it but this isn't a card I would recommend for making in mass.


I have forgotten about Merry Merlot in my creating! I pulled it out for this card and boy, am I happy that I did! This card is striking and I'm sure that's because of the Merry Merlot. I embossed the second layer with the Subtle folder. The doily looking piece is from the die set called Stitched Labels. I stamped the tree with Mossy Meadow and then die cut with In the Woods tree. The Happy is also die cut from Gold Glimmer paper. Christmas was stamped then punched. My rhinestone on the top of the tree was colored with Dark Cherry Cobbler Blend. 


I stuck with Merry Merlot for my next card and I kept it simple. I stamped the trees with Merry Merlot ink. I cut the Merry Merlot card stock with the snowbank die, stamped the greeting with VersaMark, and then heat embossed it with Gold embossing powder.


This last card I used for my Stamp-a-Stack in November. This is a class where you create 4 cards of 4 different designs for a total of 16 cards and envelopes. I have always enjoyed planning and executing these events. I am planning one for January to make birthday cards for the new year! Stay tuned for more information! I would LOVE to have you join me!

The create this card I stamped the Birch background stamp with Mossy Meadow ink. The tree and greeting are also stamped in Mossy Meadow. The tree has Shimmery Crystal Effects on it, the rhinestone on the top was colored with the Dark Cherry Cobbler Blend and the sentiment has gold marker around the edge.


I have so many more ideas for this stamp set and dies. I'm hoping to get this set out again but I don't know when as I have MANY new sets sitting on my shelves waiting to see ink. Anyone want to hibernate the winter away with me and just stamp? Ahh...that sounds like a slice of heaven to me!

Happy Stampin'!
 photo signature 2_zps5xg3zfyo.png
Supplies:
Card 1:


Product List

Card 2:


Product List

Card 3:


Product List

Card 4:


Product List