Showing posts with label technique. Show all posts

Wednesday, April 17, 2024

Artistically Inked

Artistically Inked made quite the splash when it was introduced. It had coordinating designer series paper that was absolutely beautiful in awesome bright colors. The dies and stamps were easy to create with and could make cards for anything that you needed. Now this set has been scheduled for its retirement but there is still time for a last hurrah!

Cajun Craze is not a color that I tend to gravitate towards. In fact, I have to force myself to use it once in a while. It is a beautiful color for fall but I struggle outside of the leaves. I stamped the larger background across the Crumb Cake layer with Cajun Craze ink. The die cut leaves add the perfect finishing touch.


Monday, April 15, 2024

Lighting the Way

Fireflies have such great memories for me. I remember catching them and collecting them in jars as a child. Then my own children did that too. We always let them go at the end of the night but it was fun to watch them light up and chase them around the yard. I was thinking about this when I created this first card. Isn't it so sweet?


Friday, April 12, 2024

Hope & Prayer

I love when Stampin' Up! has religious stamp sets. They really speak to my heart and I always have to buy them. I will admit to buying a few sets that I didn't love but they had something that I liked.

Hope & Prayer will be retiring at the end of the month so I had to play a little with it. I started this one with thick Basic White cardstock and added a few deckled edged rectangles for layers. The plaid layer is stamped with Sketched Plaid and then I added lines with my Gorgeous Grape marker and a ruler.


Tuesday, April 9, 2024

In the Moment

I am going to try to share all the cards that I have made with stamps that are retiring soon. This set, In the Moment, is on the retiring list. I did get this set free for attending a conference that Stampin' Up! put on but I can't say that I feel in love with it. Don't get me wrong, I like the images but I wasn't sure it was really something I loved. Therefore, it took me a while to ink this set up. Once I did, I have enjoyed coloring these images.

This card was colored with blends. I have learned to color the edges with the dark color, go over with the lighter color, and then add some details with the dark color again. This really gives me the different shading in my images.


Friday, March 29, 2024

Beary Cute

I so love these bears. I was really hoping they would hang around a bit longer but they were only part of the Stampin' Up! catalog for the life of the July-December mini. I had so much fun playing with them. Maybe you have them as part of your collection and need a few more ideas. Well, here are three more to add to CASE pile! (CASE stands for Copy And Steal Everything. It just means that you are using someone else's ideas as a jumping off point or a total copy when you are creating.)

The cardstock here is Pebbled Path and Real Red. I stamped the trees and snowfall with Whisper White ink. Make sure you add some re-inker to your Whisper White pad before you stamp. That fresh ink helps keep those images crisp looking. Also remember that Whisper White ink is a craft ink so it takes longer to dry. Be patient!


Thursday, March 28, 2024

Night Divine Scrapbook Pages

Every year Stampin' Up! comes out with a religious Christmas stamp set. I love each of the sets they have come up with every year but I think this year's was my favorite so far. I guess I should clarify that. The stamp set is some beautifully, scripted, religious greeting that went with the most fantastic manger scene set of dies. They work so well together and I love the dies!


Tuesday, March 5, 2024

Share a Milkshake

Yum! Ice cream! Sundaes! Shakes! This is right up my alley. This stamp set and coordinating dies allows you to create all of these goodies and then some. I have made a sundae with blue moon and pistachio ice cream. Hmmm...I'm not sure I really want to eat that but it sure is cute on a card! Did you notice that the cherry fits into a small cut on the ice cream? That cut is part of the die. You don't have to make that yourself and you don't really see it if you don't use it.


Friday, March 1, 2024

Sending Smiles

Sending Smiles was introduced to the Stampin' Up! lineup about two years ago. I know I purchased it and even used it but I'm not sure I have used it enough. Sigh. How do you create more time and energy to do the things that you love and the things that have to be done? I guess we keep moving forward and work on what we can, when we can.

The Garden Green background was embossed with the hobnail-glass dots embossing folder. This folder is part of the Basics Embossing Folders that are available online only. I love these folders and highly recommend adding them to your arsenal.


Wednesday, February 28, 2024

Pick of th Patch

I have more to share from the fall mini catalog. I love these pumpkins. They are so easy to work with to create some playful cards and scrapbook pages. I stacked them on this card after I had used the coordinating punch. The punch has two pumpkins, the stem and the leaf on it. This helps to make all the parts of the pumpkins fast.


Wednesday, February 21, 2024

Bird's Eye View

Aren't these birds adorable? I think they are so stinking cute and I had a ton of fun creating with them. I do wish there was a coordinating set of dies but you may remember that I don't mind fussy cutting items either. 

I inked up my acrylic block with Pumpkin Pie ink and then spritzed it with some water before "stamping" with it to create the background. The bird, branch, and leaves are all fussy cut and then adhered to the card with dimensionals. 


Friday, February 9, 2024

Sparkling Snowflakes

I'm going to say something that may sound like it is contradictory but it is very true. I love the snow. I hate the cold. Now, I live in SE Wisconsin, along Lake Michigan. When it snows, the temperature is usually around 30 degrees. The snow puts a blanket on the ground that keeps everything warm and quiet. I love that serene feel. That bitter cold...can just go away and never come back! Yuck! 

The intricacy of snowflakes is fascinating to me. All the details that God puts into one snowflake is just amazing. Image how much more he cares for each of us if a snowflake has that much detail. 

I used a technique here that is called wet stamping. I spritzed the paper with quite a bit of water and then stamped the image. Allow the paper to dry and then stamp the image again. It gives this halo affect to the card. I stamped the first layer with Berry Burst and the second with Blackberry Bliss.


Tuesday, February 6, 2024

Sweetest Cherries

Cherries are one of my favorite fruits. They just hit the spot more often than not. Their bold flavor is so delicious. I paired Sweetest Cherries with Lemon-Lime Twist and Cherry Cobbler to create some exciting cards!

The Cherry Cobbler card base is layered with a piece of Basic White cardstock that has been embossed with Painted Texture embossing folder. A piece of the Lemon-Lime Twist gingham from Glorious Gingham pack of papers, gives more color for the cherries to pop from. I did using a blending brush to add some color the edges of the circle, the cherries, the leaves and the greeting. The little white areas of the cherries is a bit of white gel pen.


Tuesday, January 30, 2024

Sweet Songbirds

The Sweet Songbirds have been around for a while. I did purchase them some time ago and they sat on my shelf waiting patiently for me to pick them to play with. Well, they finally were picked! I had fun playing with them but they can be a little putzy because everything is its own stamp. This has its advantages and disadvantages.

Blueberry Bushel is the card base with a piece of Bright and Beautiful designer series paper layered on it. The strip is Blueberry Bushel too. I stamped the bird with Blueberry Bushel, Berry Burst and Daffodil Delight. I punched the bird with Decorative Circle punch.


Monday, January 22, 2024

Color & Contour

Color & Contour is a favorite set of mine. I love this flower! It's so whimsical and fun and yet can be elegant. It's so versatile and easy to use. The coordinating dies have also been a staple in my creating sessions. They are scalloped rectangles that you will see in many of my cards.

I started with a thick Basic White base card. I stamped the flower with Night of Navy ink onto the card base. I added a piece of designer series paper that is Night of Navy, with a thin strip of Berry Burst to the left side of the card base. The one flower was stamped with Berry Burst and Daffodil Delight to highlight it. The greeting was heat embossed with white embossing powder.


Friday, January 19, 2024

Countryside Corners

Countryside Corners is a beautiful bundle that was introduced with the main catalog last spring. I bought it on my first order and have struggled to use it since. Sigh. I thought it was going to be this great set and I am stumped. I did manage to create these three cards and plan to work with this set again soon but I need some inspiration!

I used the Night of Navy marker for this first card. The frames are all one, large stamp. I think this is why I am struggling with this set. By coloring frame with the marker, I only got the one frame. I then die cut the image and added it to the card. 


Tuesday, January 16, 2024

Watercolor World

Watercolor World is a large stamp that can be a bit unyielding but it really is a beautiful image. I stamped it here in Crumb Cake and stamped the greeting with Early Espresso. I tied a Real Red ribbon around the bottom of the cardstock and adhered it to a piece of Real Red and then to the Early Espresso card base. I added a couple of gold pearls for a finishing touch. Simple!


Monday, January 15, 2024

Dainty Delights

Dainty Delights made it's debut about a year ago and became a fast favorite to many. I was slow to jump on this bandwagon. I have enjoyed this set though so here are a few of the cards that I have made. 

I adore daisies and sunflowers and cone flowers and any flowers that have that elongated petal. I embossed the Basic White layer with Painted Posies embossing folder and added the greeting and flowers to the front. The one flower is folded in half to give it even more of a cone flower look.


Friday, January 12, 2024

Happy Hedgehogs

Happy Hedgehogs is such an adorable set! It does have a coordinating hedgehog punch but I didn't use that on these cards. I do have other cards that I have shared where I do use the punch. You can search for them on the right side of my blog or click on the Happy Hedgehog link at the bottom of this post to see those.

Soft Seafoam is not an easy color for me to work with. It's so soft and the ink is even softer. I have to force myself to pull it from the shelf but when I do, I'm always pleased with the way my project turns out. I really should just use it more. The background layer is embossed with Ferns embossing folder and I ran my ink pad over the top to bring out some of the embossing.


Wednesday, January 10, 2024

Pick of the Patch

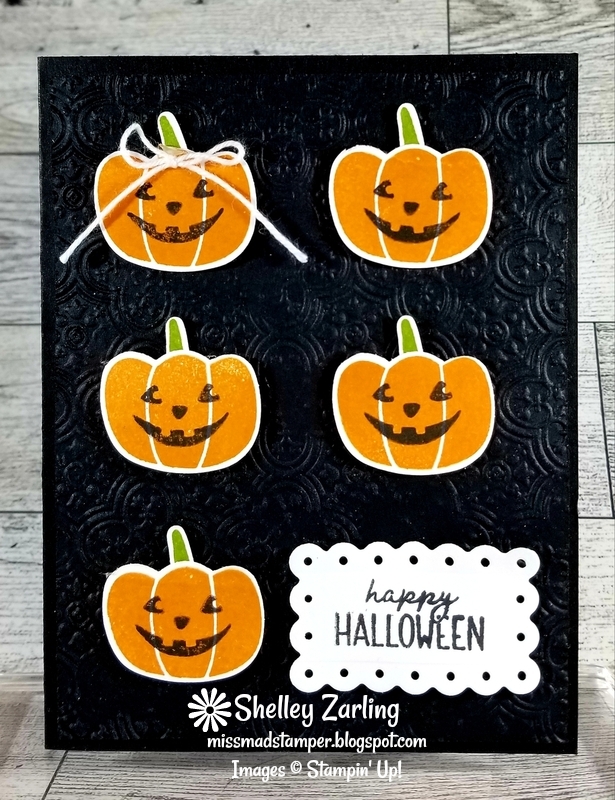
Okay, Okay. I know. I am way behind! I did have these cards made before Halloween. I even got a couple in the mail but, alas, I didn't get them on here in a very timely manner though. I still wanted to share because this is such an adorable stamp set and it just recently retired. 

I embossed a piece of Basic Black cardstock with the Quatrefoil embossing folder. I stamped the 5 pumpkins and stems on Basic White cardstock and punched them out. I added the faces and adhered them to the front of the card with dimensionals. I made the scalloped rectangle smaller. You can see how I did that HERE. 


Tuesday, December 5, 2023

Quiet Meadows

Quiet Meadows is such a beautiful set. I have loved it from the first time I saw it. I played with it over the summer and had lots of fun creating with it. 

I started with Granny Apple Green for the card base. I stamped the large flower with Granny Apple Green ink randomly on the card base. I inked up the flower stems with Garden Green and Flirty Flamingo markers. I then huffed on the image and stamped it onto the Basic White cardstock. Color in the flowers with Granny Apple Green and Petal Pink markers. Using a ruler, mark a rectangle around the flowers lightly with a pencil. Make sure when you draw your rectangle, that some of the image is outside of the rectangle. This adds a playful element to the card. Color in the rectangle with a Basic Black marker. I drew a rectangle around the outside too to add some fun. Finish card. HERE is the Facebook Live video where I show this technique and make this card.